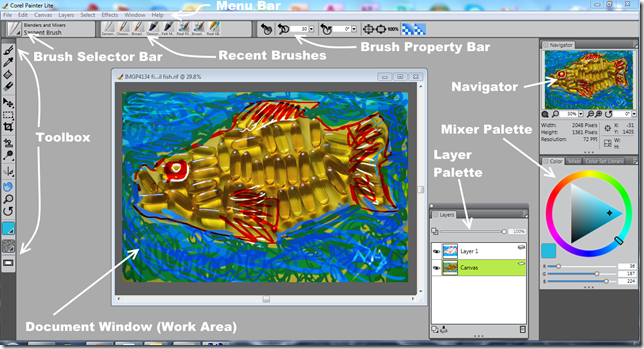
I intend to write a little about the computer workspaces (what’s on the screen) that I use and how I use the tools provided (the way the software works). Too follow up on an earlier post about workspace not workflow, and some extra inspiration from Beyond Digital Photography. Rather than describing how to use each software package, I just want to show what’s there and where various tools can be found. I am not sure why I am beginning with the Corel Painter Lite workspace, it is not strictly a photo processing program but was included as a bonus with Corel’s Aftershot Pro. It is often available in such good deals, alternatively it is available as a 30 day trial. It is now in my tool kit because its a really nice little program that lets you paint in a very natural way and it also allows you to work on photos. It is also a wonderful place to learn about brushes, colour mixing tools and layers.
![]() Like almost all windows programs there is a Menu Bar along the top of the screen, this is set of pull down menus that can access all features of the program but I must admit I very seldom use the menus. In the centre of the screen is the work area onto which you load “documents”, which can be photos or blank sheets of paper or canvas. You can have a series of these documents open on your work area at anytime but you can only work on the top one. On the right hand side is the toolbox, which has paint brush, eye dropper to pick colour, bucket fill, eraser, selection and cropping fames, cloning dodge & burn tools. There are also controls for zooming and panning, paper surface and background colour. There is an amazing range of natural media bushes and brush categories, selected with the brush selector in the upper right. Without doubt the brushes work best with a decent quality tablet (such as a wacom tablet, I have both a bamboo for the laptops and Intuit for my desktop) so that the brushes can respond to sensitive gesture hand movement and pressure.The brush properties are shown in a context sensitive property bar on the left hand side, and can be easily customised on the go. In the upper centre you can choose to display the recent brush list to help if you want to swap back and forth with the same brushes/tools.
Like almost all windows programs there is a Menu Bar along the top of the screen, this is set of pull down menus that can access all features of the program but I must admit I very seldom use the menus. In the centre of the screen is the work area onto which you load “documents”, which can be photos or blank sheets of paper or canvas. You can have a series of these documents open on your work area at anytime but you can only work on the top one. On the right hand side is the toolbox, which has paint brush, eye dropper to pick colour, bucket fill, eraser, selection and cropping fames, cloning dodge & burn tools. There are also controls for zooming and panning, paper surface and background colour. There is an amazing range of natural media bushes and brush categories, selected with the brush selector in the upper right. Without doubt the brushes work best with a decent quality tablet (such as a wacom tablet, I have both a bamboo for the laptops and Intuit for my desktop) so that the brushes can respond to sensitive gesture hand movement and pressure.The brush properties are shown in a context sensitive property bar on the left hand side, and can be easily customised on the go. In the upper centre you can choose to display the recent brush list to help if you want to swap back and forth with the same brushes/tools.
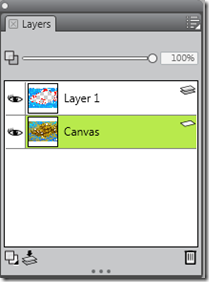
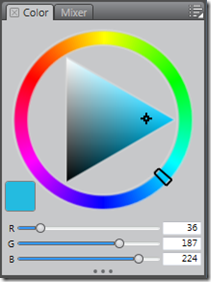
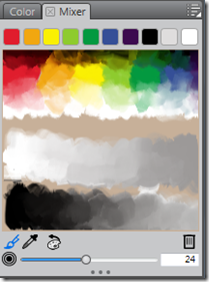
On the right hand side is the default location for a number of palettes which you can chose to display. I like the navigator which give you a thumbnail and key data about your current image. The Layer Palette has been detached in my example, and all palette can be detached as floating dialogue boxes. This palette allows you to add one or more transparent layers that float above image or blank sheet (the canvas). Anything you paint on the upper layers covers up what is below, although you can also control the opacity of this entire layer. The Mixer Palette is a marvel, it has three tabs, Colour, Mixer and Colour Set Library (which is a matrix of standard colours, but not an exhaustive selection). The Colour Tab, shows a fairly typical colour wheel and is called the colour Hue Ring. Inside this is an Saturation/Value Triangle. To select a colour, dial up the hue in the outer ring and then the move crosshairs in the triangle towards the right, for full colour saturation, or upper left paler, as in adding white, or lower right to darken the tone. The sliders below the Hue Ring show the RGB values for the selected colour. Alternatively you can set the colour you want with these sliders. The second tab the Mixer work much in the same way an artists would mix colours on his palette. The brush icon lets you mix colours, the eye dropper lets you sample the colours as mixed on your brush in the main work area.
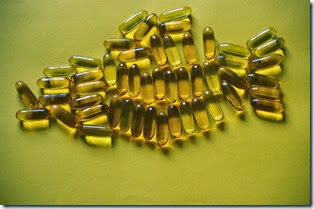
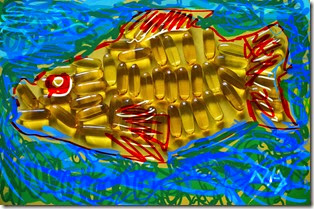
As an example of how I might use Corel Painter Lite’s capabilities, I have loaded a photo of some fish oil tablets shaped roughly into a fish shape as my canvas. I scrapped a few extra white lines into this photo to help emphasise an eye, mouth and fins, before I add a second layer and painted over it in greens and blues, rather than the originally over-powering mustard background, and a little red and dark blue emphasis on the fish. All easy steps once you are familiar with the workspace.
No comments:
Post a Comment